| |
|
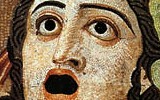
As
an ongoing project, students will make masks akin to
those worn by ancient actors. In addition, students
will learn how to perform in their masks and evoke human
emotions.
The
purpose is a heightened appreciation of masked drama,
and its capacity to convey emotion in tragic performances. |
|
|
 |
|
|
|
| |
|
 |
|
|
|
Each
student should purchase two rolls of Rigid
Wrap plaster cloth, available in Skidmore Shop.
Students
will pair off and work together over the course of two days.
On day 1 one student will make a mask by placing narrow strips
of wet Rigid Wrap on the other student's face. On day
2 the other student will make the mask of the first student.
The process should take about an hour, and will yield a personalized,
form-fitting mask.

Some
guidelines for working with Rigid Wrap
(adapted from www.bampfa.berkeley.edu/exhibits/tiepolo/masks.html):
1.
Have the model lie down on his or her back.
2.
Coat the model's eyebrows and hairline with petroleum jelly
(otherwise the mask may pull out hairs when it is removed).
It is not necessary to coat the rest of the face,
but a light coating around the jawline is helpful, especially
for those who cultivate stubble.
3. Tie
a long sheet of Saran Wrap over the top of the model's head
in order to let some of the mask run up over the forehead.
4.
Dip one strip of Rigid Wrap into a bowl of water.
Remove excess water by running it through your fingers like
a squeegee. Place wet strip onto the face of the
model and smooth down. Continue to place strips onto
the model's face, taking care to overlap the edges.
NOTE:
--
Although the first strips may be placed anywhere, it is
best to place the first few in an X shape over the nose,
from the top of the left eye to the bottom of the right,
and vice versa. This ensures a stronger structure
for the mask.
--
The model's mouth should be open and slack when that area
is covered so as to permit the wearer to speak (otherwise
his or her lower jaw will be constrained).
--
Try not to block the model's nose. Use small thin
strips when working around nostrils.
5.
After you have made one complete layer over the face, make
a second layer of strips on top of the first. Continue
in this way until you have four or five layers of strips.
Make sure that the cheeks and nose are well-layered
so that they do not collapse after drying.
6.
After completing the mask, let it dry on the face of the
model for another 10-15 minutes. For easy removal
allow the model to scrunch up his or her face until the
mask begins to pull away. The mask may then be removed
manually.
7.
Allow to dry for a day or two. One mask at a time
may be microwaved in order to dry it more quickly, but this
is not necessary.
The visually inclined should watch this video. NOTE:
-- In our sessions, the model's eyes should not be covered over with plaster cloth.
-- The model's mouth should remain open and slack (see the above guidelines).
Professor
Curley will supply all other materials, including petroleum
jelly, water, paper towels, scissors, and tarps
to lay on. |
|
| |
|
|
|
|
|
Making the masks (Monay, April 9, and Wednesday, April 11)
Weather
permitting, the class will assemble just outside Tisch, on the grass (I'll have tarps). If it is cold, rainy, or
in any way threatening, the class will meet in Filene as usual.
Students
will pair off and make masks as discussed above. A
student helper will be on hand in case of odd numbers.
Students
will need the following on each session:
- both
rolls of Rigid Wrap;
- old
clothes (at least an old shirt) -- Rigid Wrap is very messy;
- hair
pulled back; and
- good
humor, trust, and patience.
It
is imperative that students attend class on both days.
Although not an academic exercise in the usual sense, the
mask-making is still a learning experience and should be
taken seriously.
Finishing and rehearsing the masks (April 9–18)
Once
the masks are made, students should spend the next few days
giving them modest decoration. The masks should be painted
with acrylic paint, and augmented with other materials to
create facial features. Supplies of this sort are
generally available in the Skidmore Shop.
An
especially recommended product, found at craft stores
(like A. C. Moore) is Paperclay,
a durable, lightweight clay that can be easily adhered to
the mask's surface. Great for eyebrows, noses, beards,
and so forth.
Students
may be tempted to sculpt an expression onto their masks
(anger, desire, and the like). Although it is true
that ancient masks might have been made in this way, students
are advised to keep the expression of their masks as neutral
as possible.
Students may gender the facial features of their masks, as was done in antiquity. The masks need not look like the faces on which they were formed, nor need they reflect the gender of the wearer. This said, masks should be realistic: the flesh tones used should be human flesh tones, for example. Though the temptation to make a flashy mask, such as the golden Clytemnestra mask in the Peter Hall Oresteia, will be strong, resist. Make a mask that represents a fairly typical human face.
Students should mount an elastic band (provided) to the sides of their masks using brass fasteners and cloth tape or band-aids or more rigid wrap to cover the sharp edges. The fastener heads can be covered with paint.
Once
the masks are finished, students should wear them and, in
front of a mirror, practice emoting with them on (see the
list below). It takes practice to evoke true human
emotion when the face is masked, so frequent rehearsal is
important. As noted, Students will be supplied with fasteners
and elastic bands to keep their masks on.
NOTE:
Students may not use words or sounds when performing.
How can a silent, masked performer generate emotions?
That is the very problem to consider! Performers may
find it useful to have friends "spot" them and
make suggestions.
Presenting the masks (Wednesday, April 18)
The
class will assemble with completed masks in Filene.
After everyone has a good look at their peers' work, students
will don their masks and present three emotions from the
list below, plus one not listed:
| joy |
anger |
sorrow |
| desperation |
curiosity |
hatred |
| love |
pride |
greed |
Each student will supply Professor Curley with a 3 x 5 card
listing the emotions, in order, that he or she will perform.
The rest of the class will watch and guess which emotions
are being portayed. Remember, performers may not use
words or sounds.
A
discussion of the experience will follow.
|
|
|
